
Airport Security From Start to Finish: A First-Timer's Complete Walkthrough
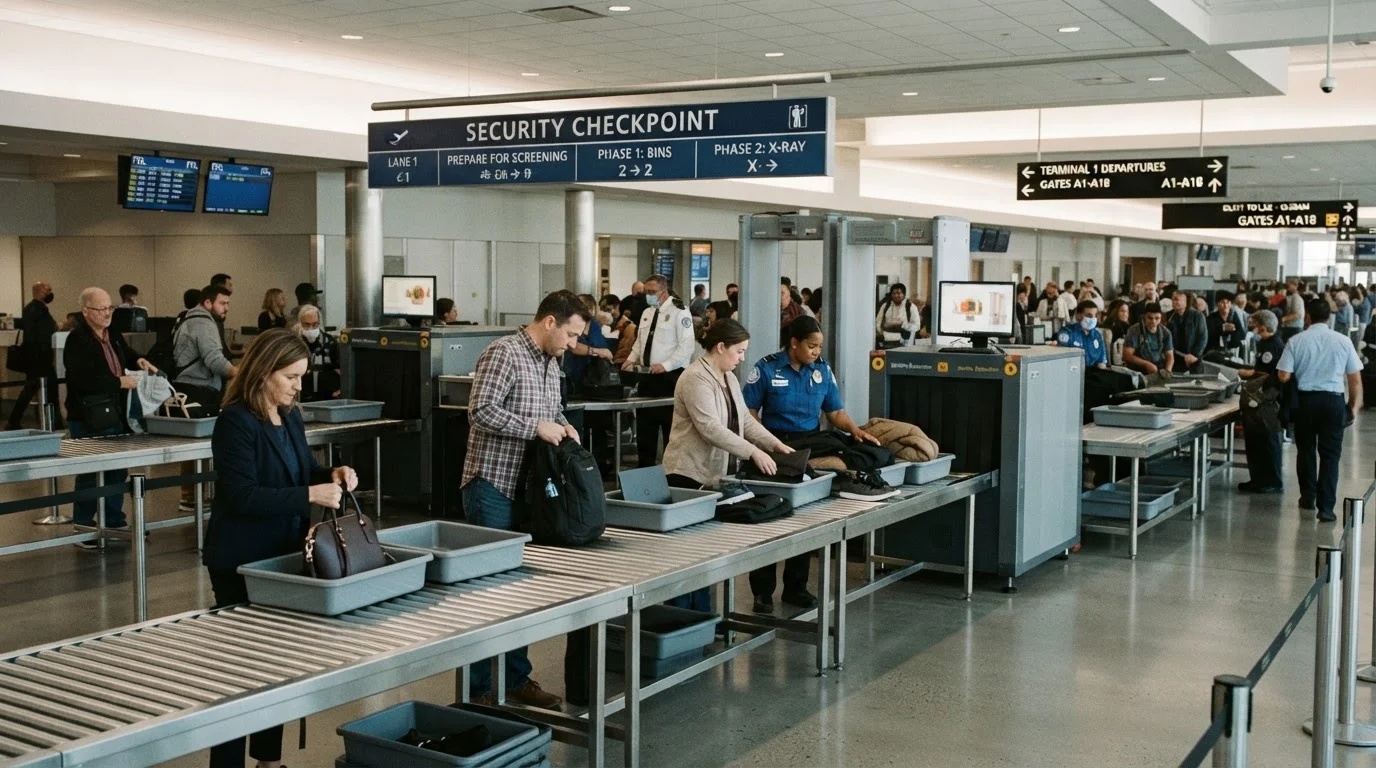
Photo credit: ExploreRoute.net | Travel Made Simple
In this article
Never been through airport security alone? This guide walks you through every step — from the queue to the conveyor belt — so nothing catches you off guard.
Key Takeaways
- Preparation before you reach the queue is what separates smooth security from stressful security.
- Liquids in carry-on bags must be 3.4 oz (100 ml) or less and fit in a single quart-sized clear bag.
- Laptops and large electronics typically need to be removed from bags and screened separately.
- Being flagged for additional screening is common and routine — stay calm and follow officer instructions.
- Arrival time matters: allow at least 90 minutes before domestic departures, more for international flights.
What Airport Security Is Actually Checking For
Airport security screening in the United States is administered by the Transportation Security Administration (TSA). Its primary function is to prevent prohibited items — including weapons, explosives, and other threats — from entering the secure airside area of an airport. Understanding this purpose reframes security not as an obstacle, but as a systematic process with clear logic.
Screening involves two main elements: scanning you as a person and scanning your belongings. Whole-body imaging machines (sometimes called body scanners) or walk-through metal detectors are used for passengers. Your carry-on bags, jackets, shoes, and personal items pass through an X-ray machine on a conveyor belt. Both processes happen nearly simultaneously, and officers are trained to flag anomalies — not penalize travelers.
TSA
The Transportation Security Administration is the U.S. federal agency responsible for screening passengers and baggage at domestic airports.
Airside
The secure area of an airport that passengers can only access after passing through security — this is where departure gates and most amenities are located.
Body imaging machine
A scanner that uses millimeter-wave technology to detect objects concealed under clothing without physical contact. Also sometimes called a whole-body scanner.
TSA PreCheck
A U.S. government trusted traveler program that allows pre-screened passengers to use faster security lanes, often skipping shoe removal and laptop unpacking.
Quart-sized liquids bag
A single, clear, resealable plastic bag roughly 7 by 8 inches in size, used to consolidate all liquid, aerosol, and gel items in your carry-on for security screening.
Explosive trace detection (ETD)
A screening method where officers swab surfaces (such as hands or bag handles) and analyze the sample for chemical traces associated with explosives.
For a broader look at what security is genuinely enforcing versus common misconceptions, see Security Theatre vs. Real Screening.
Before You Even Join the Queue
The majority of checkpoint delays stem from travelers who arrive unprepared. A few minutes of deliberate packing before leaving for the airport eliminates most friction.
- Have your ID and boarding pass accessible. You will need both at the document check before the screening lanes. A printed boarding pass or a mobile version both work — just confirm your phone screen is bright and responsive.
- Wear easy-off shoes. Shoes with complex lacing or buckles slow you down. Slip-ons or simple sneakers are practical for travel days.
- Minimize metal. Leave heavy belts, chunky jewelry, and coin-filled pockets at home or stow them in your carry-on before you reach the checkpoint.
- Pre-stage your liquids bag. Your quart-sized liquids bag should be at the top of your carry-on, ready to pull out in seconds.
Pack Your Bag With Security in Mind
When organizing your carry-on, treat security as the first test your packing must pass. Place your liquids bag, laptop, and shoes in positions that allow instant retrieval — ideally in outer pockets or at the very top of the main compartment. A bag that is easy to unpack at the checkpoint is just as easy to repack at the collection area.
This walkthrough is one piece of a larger picture — the end-to-end airport experience guide covers everything from check-in through baggage reclaim.
Moving Through the Checkpoint Step by Step
Once you reach the checkpoint, the process follows a predictable sequence. Familiarity with each stage removes the guesswork.
- Document check. Present your government-issued ID and boarding pass to the TSA officer at the entry point. They will verify your identity and clear you to proceed to the screening lanes.
- Choose a lane. Standard lanes are open to all travelers. TSA PreCheck or CLEAR lanes (where available) offer expedited screening for enrolled passengers.
- Load the bins. Place your shoes, belt, jacket, and liquids bag in separate bins. Laptops and large electronics go in their own bin, flat and unobstructed. Push the bins onto the belt — do not wait for an officer to do it.
- Walk through the scanner. Follow the officer's instruction to step into the body imaging machine or metal detector. Stand still, arms raised if directed, until cleared.
- Collect your belongings. Move your bins to the end of the belt, step aside from the immediate exit area, and re-dress before walking away. Do not leave the checkpoint area before collecting everything.
If you are navigating a large hub airport for the first time, the hub airport navigation checklist can help you orient quickly after clearing security.
Liquids, Electronics, and Other Common Sticking Points
Most carry-on rejections come down to three recurring issues: liquids over the limit, undeclared electronics, and forgotten prohibited items.
The Liquids Rule
Each liquid, aerosol, or gel in your carry-on must be in a container of 3.4 oz (100 ml) or less. All containers must fit together in a single, transparent, quart-sized resealable bag — one bag per passenger. Oversized containers will not pass, even if the bottle is only partially full.
Electronics
Laptops and tablets larger than a standard paperback book must be removed from bags and placed flat in a dedicated bin. Phones, e-readers, and small devices can typically stay in bags, though individual checkpoints may ask otherwise. Follow the posted signs and any officer directions.
Prohibited Items
Certain items are never permitted in carry-on bags regardless of size: firearms (unless declared in checked baggage per airline and TSA rules), knives above a certain blade length, and flammable substances, among others. The TSA publishes a searchable "What Can I Bring?" database on its official website. Check unfamiliar items before packing.
Check Prohibited Items Before You Pack
Carrying a prohibited item through a checkpoint — even accidentally — can result in the item being confiscated, a missed flight, or in serious cases, civil penalties. The rules are not always intuitive: some sporting equipment, tools, and medical devices have specific restrictions. Always verify unfamiliar items against the TSA's official guidance before packing your carry-on.
What Happens If You're Flagged or Pulled Aside
Being flagged for additional screening is not unusual and carries no inherent negative connotation. Scanners trigger on dense objects, certain fabrics, and residue that may be entirely benign. Here is what to expect:
- Bag check: An officer will ask permission to open and inspect your bag. You may observe the inspection. The officer will identify the flagged item and determine whether it can proceed.
- Pat-down: If the body scanner produces an alert, an officer of the same gender will conduct a pat-down of the flagged area. You can request a private screening room.
- Explosive trace detection (ETD): Officers may swab your hands or belongings and run the sample through a trace detector. This takes under a minute and is routine.
Stay calm, respond clearly to questions, and follow instructions. The process is designed to be resolved quickly. If you believe screening was conducted improperly, TSA has a formal complaint process available on its official website.
Once you are through security and heading to your gate, see our guide on what first-time long-haul flyers should know before boarding for your next set of preparation steps.
Frequently Asked Questions

Author
Smart Air Travel Editorial Team
Smart Air Travel Editorial Team is the collective byline for our editorial team and contributor network. Articles published under this byline or an editorial pen name are researched, written, and reviewed according to our editorial standards for clarity, consistency, and independence before publication.
View all articles →